Managing cold standby disaster recovery
A typical cold standby disaster recovery workflow follows. For more details, see the associated topics below.
Install and schedule
-
Prepare for cold standby installation.
-
Configure the active Blue Planet server(s).
-
Configure the backup Blue Planet server(s).
-
For a network with multiple clusters, configure another Blue Planet server (optional).
-
Identify the solution to back up for disaster recovery purposes.
-
Link the active and backup Blue Planet servers.
-
Schedule the active Blue Planet server backup.
-
Schedule the restore from the backup Blue Planet server (for testing purposes).
Periodic maintenance
-
Check status of the Blue Planet server configuration and scheduled tasks.
-
Perform on-demand backup and download of the active Blue Planet server snapshots.
In case of failure
-
Upload the backup file and restore upon catastrophic failure.
|
|
Ciena recommends that you set up the geo-redundancy client on either a backup server or separate Blue Planet server. Doing so is more efficient and automated, although it is possible to run it from another server. |
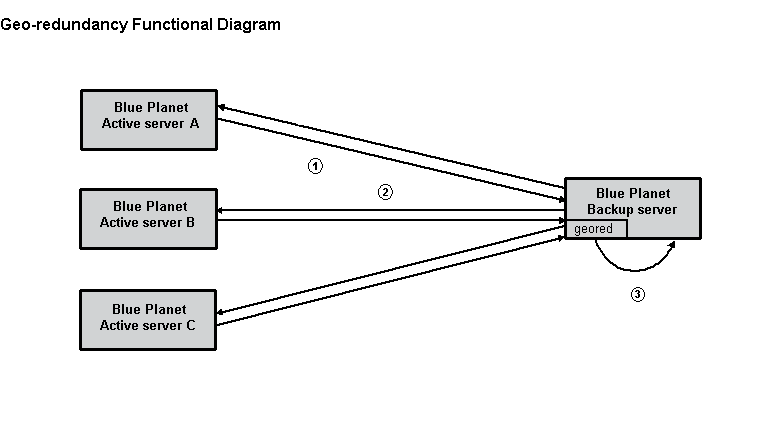
The following figure depicts a single cluster geo-redundancy workflow. You perform these configurations within the geo-redundancy software on the backup server. The following table describes the diagram process activity.
Figure 1. High availability geo-redundancy with a single cluster
Callout |
Description |
1 |
On-demand or scheduled backup — The backup server requests the active server to create a backup "snapshot" of a designated solution. The snapshot remains on the active server. |
2 |
Retrieve the snapshot image from /bp2/snapshots/<active_server_IP_address>, which is tagged uniquely by the source active server (solution name and timestamp) and store it in the backup server directory. |
3 |
On-demand or scheduled restore — Move the snapshot from the active server backup directory to the main snapshots/restore repository and restore it to the backup server. It is saved under a directory named after the IP address of the active server. |
The following figure depicts a multiple cluster geo-redundancy workflow. You perform these configurations within the geo-redundancy software on the site or cluster nodes and the backup server.

Figure 2. High availability geo-redundancy with multiple site clusters
Preparing for cold standby installation
The following guidelines are important when preparing to configure cold standby disaster recovery:
-
Once the restore to the backup server completes and the backup server is the only server where activity is performed, you must restart all external RA solutions on the backup server (using solman). If your solution does not contain RAs, you do not need to perform a restart. If you run the Appmon solution, Ciena recommends that you restart that solution as well.
-
Do not exit during backup or restore. Because geored runs in the background, if you exit the command window all the data being backed up is lost. For example, selecting CTRL+C exits geored and displays the following status message: Deleted geored server configuration database.
If you accidentally exit geored during backup, the geored application:
-
deletes the commands you completed in the basic geored configuration steps.
-
fails to complete any future scheduled backups until you perform the basic geored configuration steps.
-
-
To exit your geored console temporarily and return without impacting any process enter:
Ctrl+A d -
To return to your geored console enter:
sudo screen –r georedConsole -
In the event of a backup server reboot, reconfigure all scheduled backups.
Configuring the active Blue Planet server
To configure your cold standby active Blue Planet server:
-
Ensure the geored solution is installed by entering solutionmanager in a command window on the Blue Planet host you designate as the backup server:
$ solman
$ sps
Depending on the release number, the solution displays as georedundancy:year.month.version-patch. For example, georedundancy:16.06.1-3.
-
Perform the following steps based on how Orchestration was installed:
-
If the Orchestration solution was manually installed, run the following commands before you can run the install script:
wget "https://bootstrap.pypa.io/get-pip.py"
python get-pip.py
rm -f get-pip.py
If pip is not installed, expect to see the following output from the
sudo ./runInstall.shcommand: -
If the Orchestration solution install was completed using a Ciena provided OVA or qcow2 image, pip was installed as part of that image, or if you have completed the
wgetprocedure above, continue to the following step. -
Start the geored console on the Blue Planet backup server.
cd /bp2/geored/data
sudo ./runInstall.sh
sudo screen -S georedConsole
Inside the GNU screen that displays enter:
/bp2/geored/data/runConsole
-
-
Configure each active server in geored.
server <a_hostname> <a_IP_address> <user> <password> <tenant>
where <a_hostname> is the active server. The access credentials are admin/adminpw/master by default. The <a_IP_address> is a site IP or a host IP/domain name.
Configuring the backup Blue Planet server
To configure the cold standby backup Blue Planet server, configure each backup server in geored:
server <b_hostname> <b_IP_address> <user> <password> <tenant>
where <b_hostname> is the backup server. The access credentials are admin/adminpw/master by default. The <b_IP_address> is a site IP or a host IP.
Identifying the backup server
To identify the cold standby backup server, set up the active and backup server relationship to create the association between the backup and active servers:
set_active_servers <b_hostname> <a_hostname>
where the backup server <b_hostname> backs up the active server <a_hostname>.
For multiple active servers:
set_active_servers <b_hostname> <a_hostname1> <a_hostname2> ...<a_hostname_N>
—or—
set_active_servers <b_hostname> <a_site_hostname> <b_site_hostname> ...<c_hostname>
Listing solutions to verify software versions
List solutions available on both the active and backup servers.
list_solutions <a_hostname>
list_solutions <b_hostname>
For example, the following command lists the three solutions on this host: platform, orchestrate, and geo-redundancy.
(Cmd) list_solutions bp_machine
bpdr.io.blueplanet.orchestrate:<orchestrate_ release_#>-xxx
bpdr.io.blueplanet.platform:<platform_release_#>
bpdr.io.blueplanet.georedundancy:<geored_release_#>
Scheduling the active Blue Planet server backup
To schedule a backup for the orchestration solution:
set_server_task <a_hostname> <interval> <solution> [app1 app2 …]
where <a_hostname> is the active server and interval indicates the number of seconds to run a backup and download operation for the solution.
Use one of the valid target solution names from the list of solutions returned in the previous step. The name and version number of the solution must match between the active and backup servers. The application list of the solution is optional. There is no backup for platform or RA solutions as they are stateless and do not change.
You can also manually back up using the list command output. For example:
set_server_task bp_machine 100 bpdr.io.blueplanet.orchestrate_<release_#>-ipvpn-1 bpocore
Scheduling a restore from the backup
-
To schedule a restore:
-
Enter:
set_server_task <b_hostname> <interval> <solution> [app1 app2 …]
where <b_hostname> is the backup server, interval indicates the number of seconds to run an upload and restore operation for the solution.
Use one of the target solution names from the list of solutions returned in the previous step. The name and version number of the solution must match between the active and backup servers. The application list of the solution is optional. You can also manually restore using the list command output (see step 10). For example:
set_server_task bp_machine 100 bpdr.io.cyan.orchestrate:<release_#>-latest
-
To remove the task, enter:
delete_server_task <hostname> <solution>
If you do not remove the task while the timer is running, then this task continues to run. Stop and start the timer for all tasks using the following commands:
stop_timer
start_timer
-
Performing an on-demand backup
To perform a backup on-demand:
backup <a_hostname or b_hostname> <solution> <snapshot> [app1 app2 …] download <a_hostname or b_hostname> <solution> <snapshot directory>
Directory is either default or a full path on the local server.
Uploading the backup file and restoring it on the server
To perform a restore on-demand:
upload <b_hostname> <snapshot directory> restore <b_hostname> <solution> <snapshot> [app1 app2 …]
where <b_hostname> is the target to where the snapshot is uploaded and <b_hostname> is where the snapshot is restored (in both cases, the backup server).
Directory is either default or a full path on the local server.